It’s always exciting to see pictures of the stuff you do in action. Recently, Worldlabel.com featured my spice labels on their website. Check it out:
![]()
http://blog.worldlabel.com/2011/spice-jar-labels-and-template-to-print.html

It’s always exciting to see pictures of the stuff you do in action. Recently, Worldlabel.com featured my spice labels on their website. Check it out:
![]()
http://blog.worldlabel.com/2011/spice-jar-labels-and-template-to-print.html
Here’s a set of Christmas printables I did up that would be perfect for a low key holiday party. Would look great with some canvas or raffia accents.

The North Pole tags can be used as cupcake or drink embellishments. If using them for drinks, make sure you use plastic straws. I used paper candy sticks, and they dissolved in my hot chocolate. Somehow paper chunks don’t have the same effect as marshmallows. :P


A lot of veggie lasagne recipes call for zucchini and eggplant as the meat substitute, which is fine if you like zucchini…or eggplant, but neither of us are keen on either. (This is a real annoyance when dining out, as most chefs will use both in what few vegetarian options they offer on a menu). Perhaps I should have mentioned that the irony of writing a blog mostly about food is that we’re ridiculously picky eaters?
Anyway, this is an eggplant-free, zucchini-free, vegetarian version of the LoonySpoon’s recipe a friend sent me a while back when I was making lasagne for friends who were expecting their first child (recipe can be found here). I’ve doubled the recipe here since they freeze well and make great gifts. It’s always good to have lasagne on hand for those nights you just don’t feel like cooking.
Ingredients:
Sauce:
10 sun-dried tomatoes (not oil-packed)
2 teaspoons olive oil
2 cups diced onions
2 teaspoons minced garlic
2 cups chopped mushrooms
1 pkg extra firm tofu, diced or chopped in a food processor
1 jar (700 mL) tomato sauce (we use the Classico Spinach and Cheese)
1 large can (19 oz/540 mL) diced tomatoes with Italian herbs, undrained
2 Tbsp balsamic vinegar
2 Tbsp brown sugar
salt
freshly ground black pepper
1/2 cup minced fresh basil leaves
Filling:
2 cups light ricotta cheese
2 300g pkgs soft tofu
1/2 cup shredded parmesan
2 package frozen spinach, thawed, squeezed dry and chopped
2 eggs
2 boxes of oven ready lasagna noodles (I like having extra on hand)
2-3 pkgs shredded 4-cheese blend (we like ours extra cheesy)
Directions:
Sauce:
Assembling the lasagnes:
I buy 2 of the 3 packs of 8x8” aluminum pans for this. Store flat in the freezer until frozen, and then stack.
Makes 6 8x8” lasagnes.
For those still looking for a way to spruce up their hallowe’en party, I’ve designed a set of hallowe’en printables for you. Included is a set of letters for a holiday banner, treat labels, place cards and cupcake wraps.
enjoy. :)


Things have been pretty busy since Hannah joined us 3 weeks ago. I will admit, it’s been a bit of an adjustment: getting used to everything I wear smelling like curdled milk, and learning to appreciate a 2 hour stretch of sleep as ‘quality rest’.
So this year’s thanksgiving will be pretty low key, considering TC is a vegetarian and the kid will only make the screaming stop in small increments. Plus, it will be tough to top last year’s turducken (it is the super protein).
So, if your Thanksgiving is a little more action packed, and you’re looking for a little something to spruce it up, here are some easy to print decorations that will add a special touch to any special event you may be planning. :)


I’ll admit. That pinterest is like crack. I can sit for hours scouring through the pages of DIY inspiration longing for the day when I’ll have unlimited time and an unlimited budget to accomplish the things that get posted on there. (Anyone want to pay me to craft full time?).
I came across this on pinterest and thought: hey, that looks easy. Clearly I shouldn’t listen to my brain as often as I do.

Image and tutorial from evie –s.
It starts out with some leftover cardboard and some painters tape. Do yourself a favour, try to use a similar colour tape to the yarn you plan to use. Or better yet, paint the whole thing that colour so you can get away with missing a touch or two.

Then it’s just a matter of starting the yarn somewhere and wrapping. Sounds simple enough, but it takes a lot longer than you intend. It’s a good thing the Tour de France is a month long, because otherwise I would have had to find something else to watch while I wrapped.
The flowers went through a few iterations:

Until I finally settled on these:

Tutorial for making them can be found HERE. What I did do was attach the flowers to bobby pins for easy insertion (clean minds, folks), so that they can be moved frequently to change the look of the craft.
And the final product:

The orange was a bit of a battle. I wanted something less girly than pink. I’ve never been a pink person, and quite frankly, it’s a ridiculous colour to decorate with (it’s a very, very thin line between a nice pink and pepto bismol). TC wasn’t sold on the idea of orange and everyone else we spoke to seemed to scratch their heads.
The other battle was with the paint. I’m normally a loyal Benjamin Moore user, but since trying their Natura line, have been less than impressed with them. Everyone and their uncle was raving about Behr Ultra, and despite still not having lived down the Ralph Lauren paint experience (the paint that started chipping even before it was dry), decided to give Home Depot another chance. I think it was probably naive of me to assume that a paint that touts itself as ‘paint and primer in one’ would say, not require priming. Apparently I was wrong according to the overly perky teenager at the paint counter, and was required to pick up an additional bucket of the ugliest tinted peach primer you ever did see:

But it wasn’t the orange that killed us. I can justify 1 coat of primer and 2 coats of orange paint. Everyone says red’s the worst colour to paint and orange isn’t that far off, right? But it was the bloody white. You’d think that a primer-and-paint-in-one wouldn’t need 4 coats to get any sort of coverage, but you’d be wrong, and probably standing very close to a very irate and sore 7 months pregnant version of me.
To top all that insanity off, right after the painting experience, TC’s back decided it had had enough, and TC spent the next 3 weeks on the couch pretty much useless (well, unless you needed something googled). So yeah, thanks Behr.
It was worth it in the end though. I really do love how everything turned out and that everything did indeed come together. I had a bit of a panic attack when the seller for the wall decals I’d picked out on etsy went on prolonged leave, but she made special exception for me and did a fantastic job.
This is the final product:

The frames were originally black ikea cheapies that were painted with white oil paint. To save yourself the heartache of chipping, like I didn’t, sand thoroughly and prime first. The art is just fabric TC picked at the fabric store that we mounted using the existing mattes.


Since the other albums I’ve posted are more boy/gender neutral oriented, here’s a more girly version for those looking for something pink.


I served this dish with the potato rosti from Rose Elliot’s Sumptuous Suppers. The pancakes were okay, but not enough to post about (aside from this one-liner, I guess). The salad however, was REALLY tasty. It’s loosely based on the Tofu Salad in Terry Walter’s Clean Food Cookbook, but after realising I didn’t have mayo or mirin, I pretty much ditched the recipe.
Here’s how I made mine:
Ingredients:
1 pkg extra firm tofu
Tofu Marinade:
2 Tbsp soy sauce
1 Tbsp rice wine vinegar
1/4 tsp ground ginger
1/4 tsp five spice
1/2 tsp brown sugar
salt and pepper to taste
Salad:
1/4 cup chopped fresh parsely
5 or 6 fresh sage leaves, minced
2 celery stalks, chopped
1/4 cup diced white onion
2 cups fresh spinach
1 cup chopped tomatoes
1 Tbsp sesame or peanut oil
Directions:
The great part of this salad is that you can bake the tofu on the weekend, and serve this as a light dinner mid-week in a flash. We found that the salad alone was filling enough without the potato pancakes, but it could also be a great side dish to any Asian styled meal.
If you’re not keen on the tofu, you could use the marinade on boneless skinless chicken breast (just don’t use the sauce in the dressing after you’ve marinated the chicken).
I’d put a Toughest Critic rating here, but he’s upstairs bathing the dog, and I’ve learned not to interrupt that special time, or risk being roped in to helping. I’d rather not end up covered in dog shampoo tonight, so we’ll just assume he says ‘tasty cakes’. :P
Mod style owls are all the rage these days when it comes to baby decor. A close friend of mine just did her entire nursery using the Life’s a Hoot fabrics, so I thought I’d design something to match:

So here’s episode 2 of our baby album instalments. Enjoy. :)


I was looking all over etsy trying to find the perfect baby album for us the other day, and decided my brain just could not handle writing things like ‘what daddy thought when mommy’s water broke’ down for my little one to ‘enjoy’ or ‘what daddy forgot to pack’ for years down the road (and because really, ‘what daddy forgot to pack’ will likely result in a ‘what mommy tried to throw at him’ diatribe, the less I have to write, the better).
So, in doing all that, I’ve designed a couple of album templates for those of you who, like me, wanted something a little more customizable and personalized. Keep checking back over the next few weeks as I upload more.
Today’s is a mod style red, gray and blue.


I’m sure by now you’ve discovered my love for mod styled things when it comes to my kid’s room. Well, not just my kid’s room, but TC isn’t really into that look, so it’s a bit of a battle trying to convince him to buy anything in that style. I can’t tell you the amount of times we’ve stood in the middle of Home Sense arguing over the need for a $19.99 vase. You’d think we were talking about the holy grail, or at least something with a higher price point.
Anyway, I fell in love with these bookends on etsy one day:
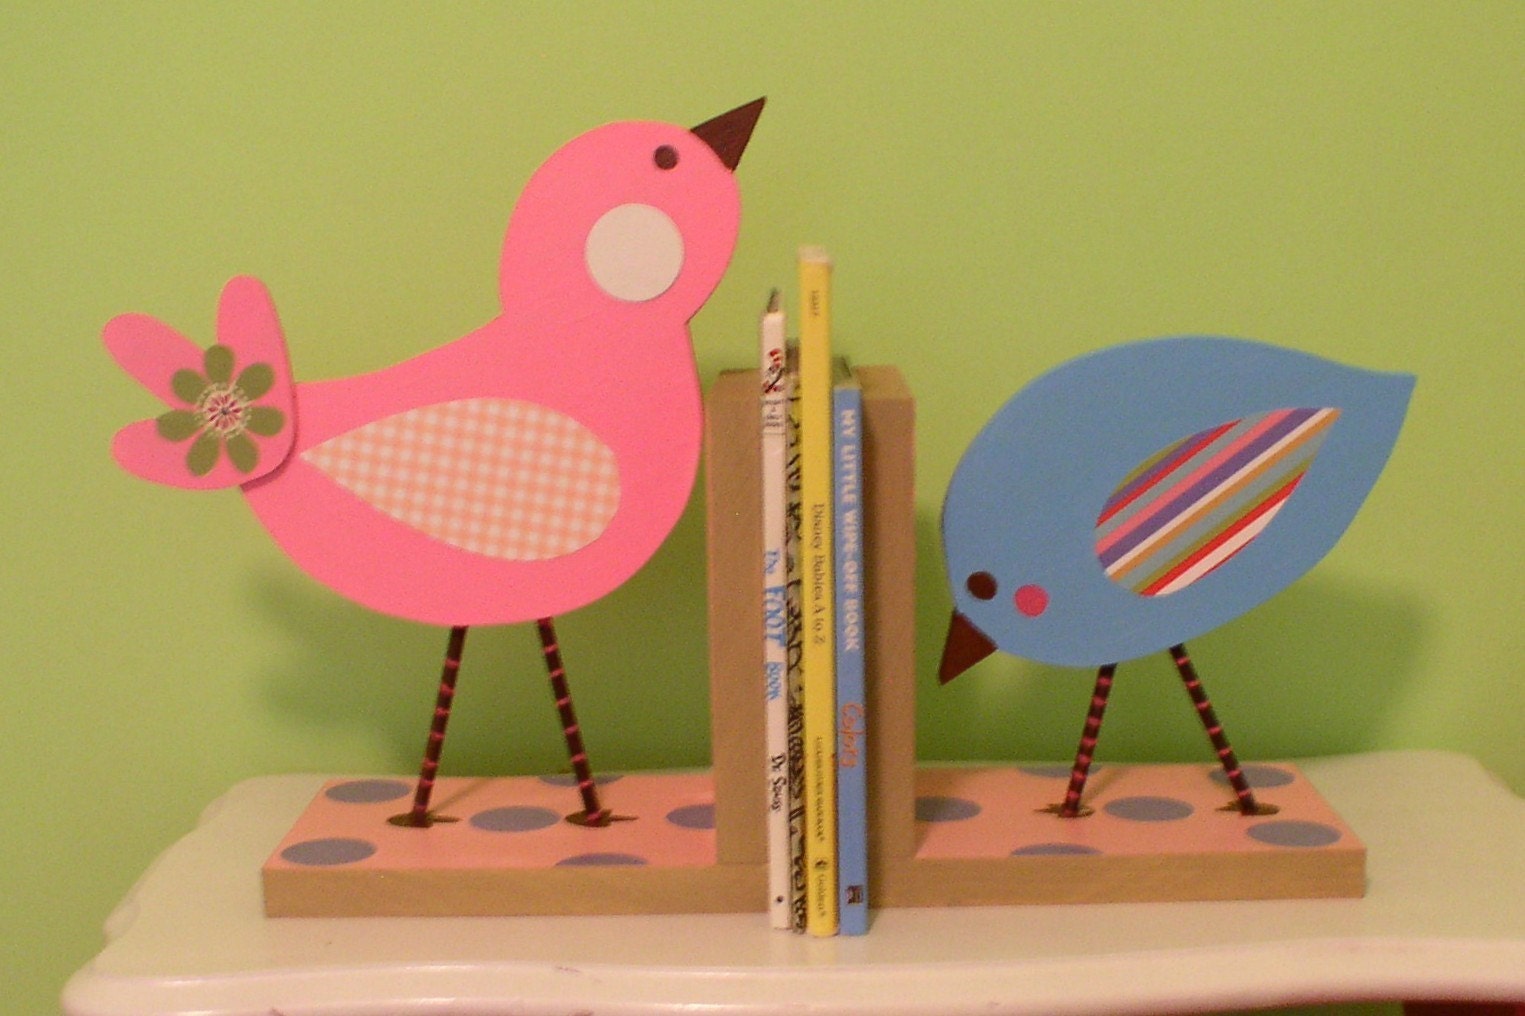
But alas, TC would not bite at the price tag.
Luckily, I have a very handy father-in-law with a well equipped workroom (our postage stamp garage barely fits the cars, let alone the chop saw that’s never been put away), who was more than willing to help us take on this project. So, last time we ventured home, TC, Father-In-Law, Mother-In-Law (who’s major function in this operation was documenting the fact that it took 3 of us to use the belt sander), and I took on this project. Mother-In-Law had surprisingly saved the wood from the signs we used for our wedding:

Basically, because I do realise this is a craft blog and I’ve yet to take step-by-step photos, I drew the shapes of the birds out on the wood, and cut them out using the scroll saw. The bases are roughly 8 inches by 4 inches, and the birds sit on top. Father-in-Law was the brains behind the logistics, because quite frankly, when it comes to drill presses, it’s safer for everyone’s limbs if I just say ‘this needs to look like that’, and then step back. So, dowels were cut, holes were drilled, and eventually we ended up with something that looks like this:

You can see where I drew the angles of the legs on the birds. This will guide the drill press that I know all of you have.
So, a few months of procrastinating later, these were re-assembled on the opposite coast, painted and modge-podged (everything nursery related seems to end in modge podge).
And voila, the final product:


I wanted to do alphabet blocks for the nursery because I remember having them as a kid, and I keep seeing them pictured in those fancy houzz.com nurseries I’ve been drooling over as inspiration.
Basically, all you have to do is take some 2x2x4’s that they sell for stair balusters and cut them into blocks. Sand and paint 2 sides of each.
Download the pdf HERE. Print, cut out and modgepodge the letter squares to the blocks, using scrapbook paper to cover the remaining sides. For the letters, I just typed them out using random fonts in MSWord and then cut them out. Cover blocks with another 3 coats of modgepodge, and you’re done!

In the coming months, if there’s interest, I may upload a set in a more neutral palette, since I know my orange and slate grey nursery isn’t exactly what everyone’s going for these days. It looks great though, I promise:


