Showing posts with label DIY. Show all posts

Tuesday, April 10, 2012

Coat Rack Bookends

IMGP0002

I’m sure you’ve seen the IKEA spice rack book holders on pinterest that are so popular that it’s becoming impossible to find them in stock at an IKEA store:

image

Original Source

Originally, I was hoping to do something similar, but we couldn’t find them in stock at our local IKEA.  While I love the bookends I made a while back for the nursery, they aren’t durable enough to withstand the wear a soon to be walking kid will impart.  Instead, I came up with the idea of putting pegs in the shelf at intervals to hold up the books, but keep the spines visible.  Since I didn’t want to drill directly into the shelves (the particleboard and melamine combo can be a pain to drill cleanly), we decided to go with the coat rack look.

The wood was scrap from home depot (less than $1), and the pegs were $0.69 for 2.  If you’re super resourceful, you could probably pick one up at a garage sale for less.

IMGP0004

Sunday, February 5, 2012

Month Old Signs

IMGP0004_1

We’ve been taking monthly pictures of our kidlet to track her growth since everything changes so fast in these first months (that and we’re proud parents, so we really don’t need an excuse to crack out the camera and taunt the kid with stuffed animals). 

In today’s edition of ‘now you can too’, I’ve uploaded the monthly circles in 4 separate colours so you too can annoy your friends with monthly pictures…I mean, track your child’s growth.  I used a lollypop stick, but a popsicle stick, old chopstick or any other child-safe pokey bit will do.  I glued (good ole’ Elmer’s) it to a piece of cardstock that I cut to the same size as the rounds, like so:

IMGP0025

Each month I peel off the previous month’s, and attach the new month with a glue stick, and voila!

IMGP0032

Download Blue Circles

Download Pink Circles

Download Mod Orange

Download Mod Purple

Rocket Ship

A friend of mine is doing her son’s room in a rocket ship theme.  I haven’t broken out the paints since my art school days (mainly because I’m still reliving the obnoxious condescension from my art critiques), but I had some canvases hanging around and thought ‘what the heck’?  I think they turned out okay, no?

IMGP0003IMGP0001

Tuesday, January 17, 2012

Baby Shadow Boxes


IMGP0021

I wanted to give the parents some sort of footprint/handprint memento for Christmas, but I found that a lot of those kits you can buy at Michael’s are only for kids aged 6 months and up.   Someone recommended using Crayola’s Model Magic, which is what we ended up using. 

To be honest, I’m not entirely sure I recommend it as a mould making product.  TC and I had to wrestle the kid (who at the time was squirming like a wet cat) and still couldn’t manage to get a nice handprint.  The footprint required a lot of force, and the process ended up warping the edges (I really wanted clean edges).  

In the end though, I think the shadow boxes turned out okay.

(photos were printed at London Drugs directly on to foam core for easy mounting)

Christmas Cards 2011

I wanted to do something simple and easy this year because I was running short on time.  Normally I start making christmas cards in January (not because I’m a keener, but because we’ve been selling them to raise funds for TC’s Ride to Conquer Cancer).

These cards look labour intensive, but they’re really not.

IMGP0029

All you have to do is rip canvas to your desired size (I had a stack of 4.5x6 cardstock that I had kicking around, so that was the size I went with).  Stamp canvas with a holiday stamp of your choosing.  Layer on top of cardstock, run it through the sewing machine, and voila!  The hard part for me was running the darn thing through a sewing machine.  It turns out that not sewing since grade 8 home-ec makes me a terrible seamstress.  The card looks great from here.  Just don’t flip it over.

We included a family letter in ours (yes, we’re THOSE people), and a picture of the kid that I took in front of the tree once we had it up (I needed an excuse to buy a pair of ruffled diaper covers)

IMGP0032

Here’s my invitation writing station all set up:

IMGP0038

And, if you’d like to make these your cards next year, I’ve put up a pdf of the wrap around labels:

Download PDF

Tuesday, November 22, 2011

Worldlabel.com feature

It’s always exciting to see pictures of the stuff you do in action.  Recently, Worldlabel.com featured my spice labels on their website.  Check it out:

image

http://blog.worldlabel.com/2011/spice-jar-labels-and-template-to-print.html

Gingham Holiday Printables

Here’s a set of Christmas printables I did up that would be perfect for a low key holiday party.  Would look great with some canvas or raffia accents.

IMGP0004

The North Pole tags can be used as cupcake or drink embellishments.  If using them for drinks, make sure you use plastic straws.  I used paper candy sticks, and they dissolved in my hot chocolate.  Somehow paper chunks don’t have the same effect as marshmallows. :P

IMGP0009

IMGP0016

Download pdf here.

Saturday, October 29, 2011

Hallowe’en Printables

For those still looking for a way to spruce up their hallowe’en party, I’ve designed a set of hallowe’en printables for you.  Included is a set of letters for a holiday banner, treat labels, place cards and cupcake wraps.

enjoy. :)

Wicked_Halloween7

Wicked_Halloween2

Download PDF Here.

Sunday, October 2, 2011

Thanksgiving Printables

Things have been pretty busy since Hannah joined us 3 weeks ago.  I will admit, it’s been a bit of an adjustment: getting used to everything I wear smelling like curdled milk, and learning to appreciate a 2 hour stretch of sleep as ‘quality rest’.

So this year’s thanksgiving will be pretty low key, considering TC is a vegetarian and the kid will only make the screaming stop in small increments. Plus, it will be tough to top last year’s turducken (it is the super protein). 

So, if your Thanksgiving is a little more action packed, and you’re looking for a little something to spruce it up, here are some easy to print decorations that will add a special touch to any special event you may be planning. :)

IMGP0013

IMGP0003

IMGP0008

Download PDF here.

Thursday, September 22, 2011

Yarn Wrapped Initial

I’ll admit. That pinterest is like crack. I can sit for hours scouring through the pages of DIY inspiration longing for the day when I’ll have unlimited time and an unlimited budget to accomplish the things that get posted on there. (Anyone want to pay me to craft full time?).

I came across this on pinterest and thought: hey, that looks easy. Clearly I shouldn’t listen to my brain as often as I do.

Image and tutorial from evie –s.

It starts out with some leftover cardboard and some painters tape. Do yourself a favour, try to use a similar colour tape to the yarn you plan to use. Or better yet, paint the whole thing that colour so you can get away with missing a touch or two.

IMGP0004

Then it’s just a matter of starting the yarn somewhere and wrapping. Sounds simple enough, but it takes a lot longer than you intend. It’s a good thing the Tour de France is a month long, because otherwise I would have had to find something else to watch while I wrapped.

The flowers went through a few iterations:

284005_10150693347995144_640550143_19290289_4679834_n

Until I finally settled on these:

IMGP0041

Tutorial for making them can be found HERE. What I did do was attach the flowers to bobby pins for easy insertion (clean minds, folks), so that they can be moved frequently to change the look of the craft.

And the final product:

IMGP0038

Saturday, September 17, 2011

Saturday, September 10, 2011

Baby Albums – Pink Birds

Since the other albums I’ve posted are more boy/gender neutral oriented, here’s a more girly version for those looking for something pink.

IMGP0011

BabyAlbumGenericPink_Page_05BabyAlbumGenericPink_Page_04BabyAlbumGenericPink_Page_17BabyAlbumGenericPink_Page_11

Download .pdf here

Saturday, September 3, 2011

Baby Albums – Owl Theme

Mod style owls are all the rage these days when it comes to baby decor. A close friend of mine just did her entire nursery using the Life’s a Hoot fabrics, so I thought I’d design something to match:

IMGP0014

So here’s episode 2 of our baby album instalments. Enjoy. :)

BabyAlbumOwl_Page_01BabyAlbumOwl_Page_06BabyAlbumOwl_Page_09BabyAlbumOwl_Page_08

Download .pdf here.

Saturday, August 27, 2011

Baby Albums – Mod Red and Blue

IMGP0016

I was looking all over etsy trying to find the perfect baby album for us the other day, and decided my brain just could not handle writing things like ‘what daddy thought when mommy’s water broke’ down for my little one to ‘enjoy’ or ‘what daddy forgot to pack’ for years down the road (and because really, ‘what daddy forgot to pack’ will likely result in a ‘what mommy tried to throw at him’ diatribe, the less I have to write, the better).

So, in doing all that, I’ve designed a couple of album templates for those of you who, like me, wanted something a little more customizable and personalized. Keep checking back over the next few weeks as I upload more.

Today’s is a mod style red, gray and blue.

BabyAlbum_ModBoy2BabyAlbum_ModBoy3BabyAlbum_ModBoy6BabyAlbum_ModBoy12

Download pdf here.

Sunday, August 21, 2011

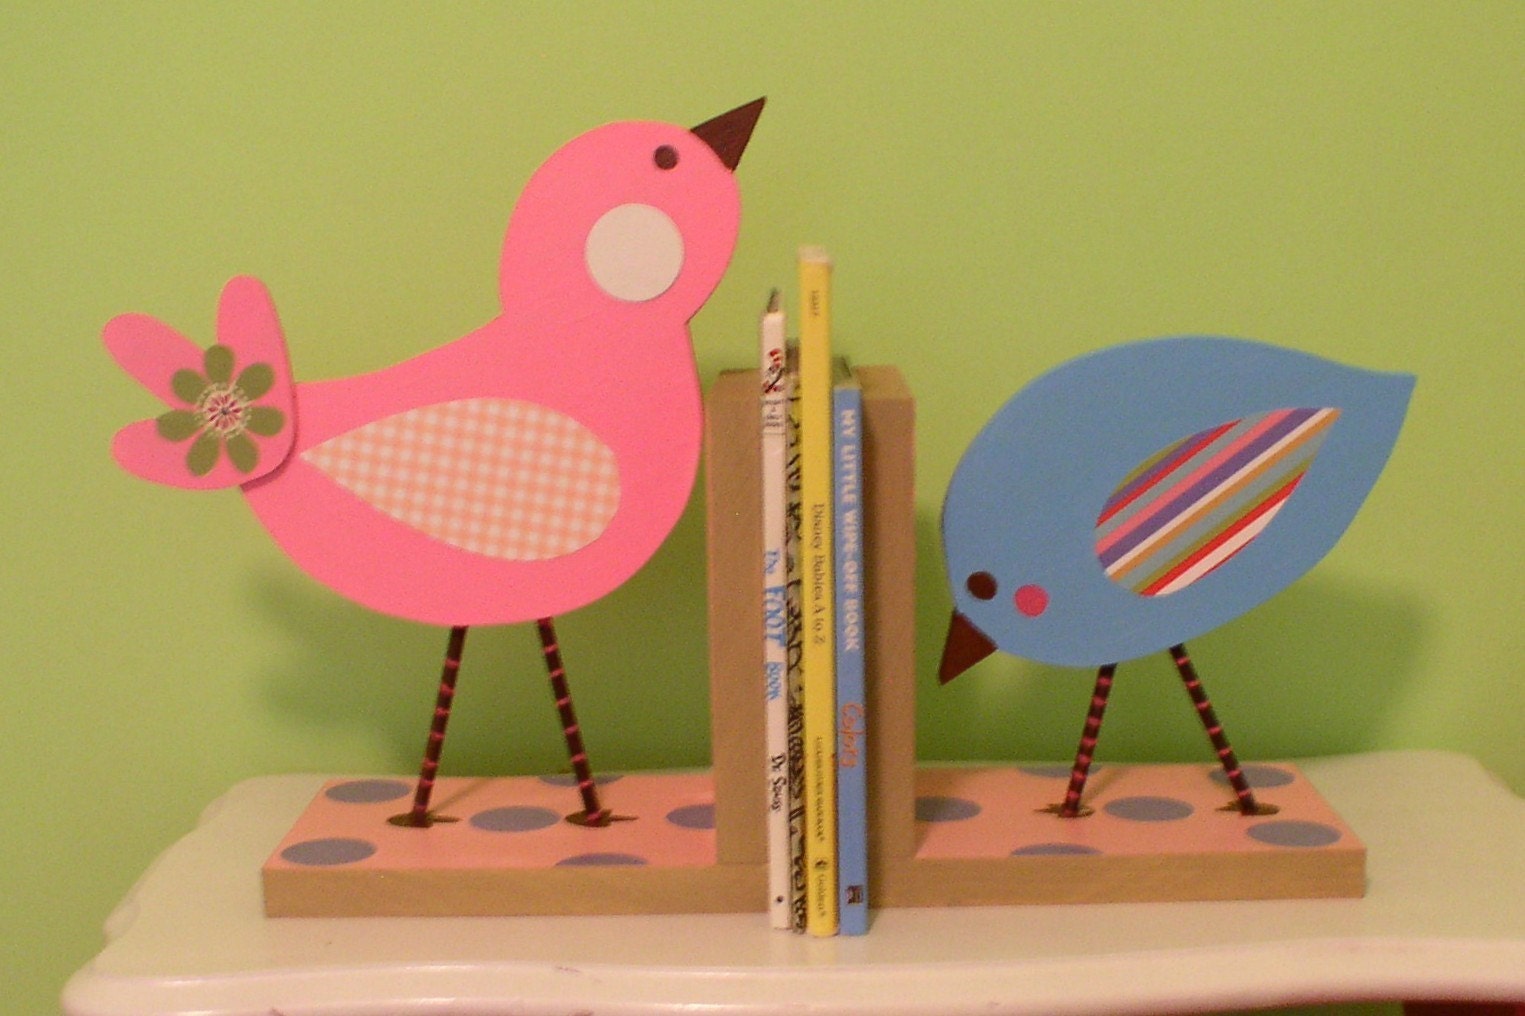
Mod Bird Bookends

I’m sure by now you’ve discovered my love for mod styled things when it comes to my kid’s room.  Well, not just my kid’s room, but TC isn’t really into that look, so it’s a bit of a battle trying to convince him to buy anything in that style.  I can’t tell you the amount of times we’ve stood in the middle of Home Sense arguing over the need for a $19.99 vase.  You’d think we were talking about the holy grail, or at least something with a higher price point. 

Anyway, I fell in love with these bookends on etsy one day:
The Wooden Owl on Etsy.

But alas, TC would not bite at the price tag.

Luckily, I have a very handy father-in-law with a well equipped workroom (our postage stamp garage barely fits the cars, let alone the chop saw that’s never been put away), who was more than willing to help us take on this project.   So, last time we ventured home, TC, Father-In-Law, Mother-In-Law (who’s major function in this operation was documenting the fact that it took 3 of us to use the belt sander), and I took on this project.  Mother-In-Law had surprisingly saved the wood from the signs we used for our wedding:

Signs

Basically, because I do realise this is a craft blog and I’ve yet to take step-by-step photos, I drew the shapes of the birds out on the wood, and cut them out using the scroll saw.   The bases are roughly 8 inches by 4 inches, and the birds sit on top.  Father-in-Law was the brains behind the logistics, because quite frankly, when it comes to drill presses, it’s safer for everyone’s limbs if I just say ‘this needs to look like that’, and then step back.   So, dowels were cut, holes were drilled, and eventually we ended up with something that looks like this:

247965_10150618960845338_884370337_18642029_6616519_n

You can see where I drew the angles of the legs on the birds.  This will guide the drill press that I know all of you have. 

So, a few months of procrastinating later, these were re-assembled on the opposite coast, painted and modge-podged (everything nursery related seems to end in modge podge).

And voila, the final product:

IMGP0009

IMGP0013