Saturday, August 27, 2011

Baby Albums – Mod Red and Blue

IMGP0016

I was looking all over etsy trying to find the perfect baby album for us the other day, and decided my brain just could not handle writing things like ‘what daddy thought when mommy’s water broke’ down for my little one to ‘enjoy’ or ‘what daddy forgot to pack’ for years down the road (and because really, ‘what daddy forgot to pack’ will likely result in a ‘what mommy tried to throw at him’ diatribe, the less I have to write, the better).

So, in doing all that, I’ve designed a couple of album templates for those of you who, like me, wanted something a little more customizable and personalized. Keep checking back over the next few weeks as I upload more.

Today’s is a mod style red, gray and blue.

BabyAlbum_ModBoy2BabyAlbum_ModBoy3BabyAlbum_ModBoy6BabyAlbum_ModBoy12

Download pdf here.

Sunday, August 21, 2011

Mod Bird Bookends

I’m sure by now you’ve discovered my love for mod styled things when it comes to my kid’s room.  Well, not just my kid’s room, but TC isn’t really into that look, so it’s a bit of a battle trying to convince him to buy anything in that style.  I can’t tell you the amount of times we’ve stood in the middle of Home Sense arguing over the need for a $19.99 vase.  You’d think we were talking about the holy grail, or at least something with a higher price point. 

Anyway, I fell in love with these bookends on etsy one day:

The Wooden Owl on Etsy.

But alas, TC would not bite at the price tag.

Luckily, I have a very handy father-in-law with a well equipped workroom (our postage stamp garage barely fits the cars, let alone the chop saw that’s never been put away), who was more than willing to help us take on this project.   So, last time we ventured home, TC, Father-In-Law, Mother-In-Law (who’s major function in this operation was documenting the fact that it took 3 of us to use the belt sander), and I took on this project.  Mother-In-Law had surprisingly saved the wood from the signs we used for our wedding:

Signs

Basically, because I do realise this is a craft blog and I’ve yet to take step-by-step photos, I drew the shapes of the birds out on the wood, and cut them out using the scroll saw.   The bases are roughly 8 inches by 4 inches, and the birds sit on top.  Father-in-Law was the brains behind the logistics, because quite frankly, when it comes to drill presses, it’s safer for everyone’s limbs if I just say ‘this needs to look like that’, and then step back.   So, dowels were cut, holes were drilled, and eventually we ended up with something that looks like this:

247965_10150618960845338_884370337_18642029_6616519_n

You can see where I drew the angles of the legs on the birds.  This will guide the drill press that I know all of you have. 

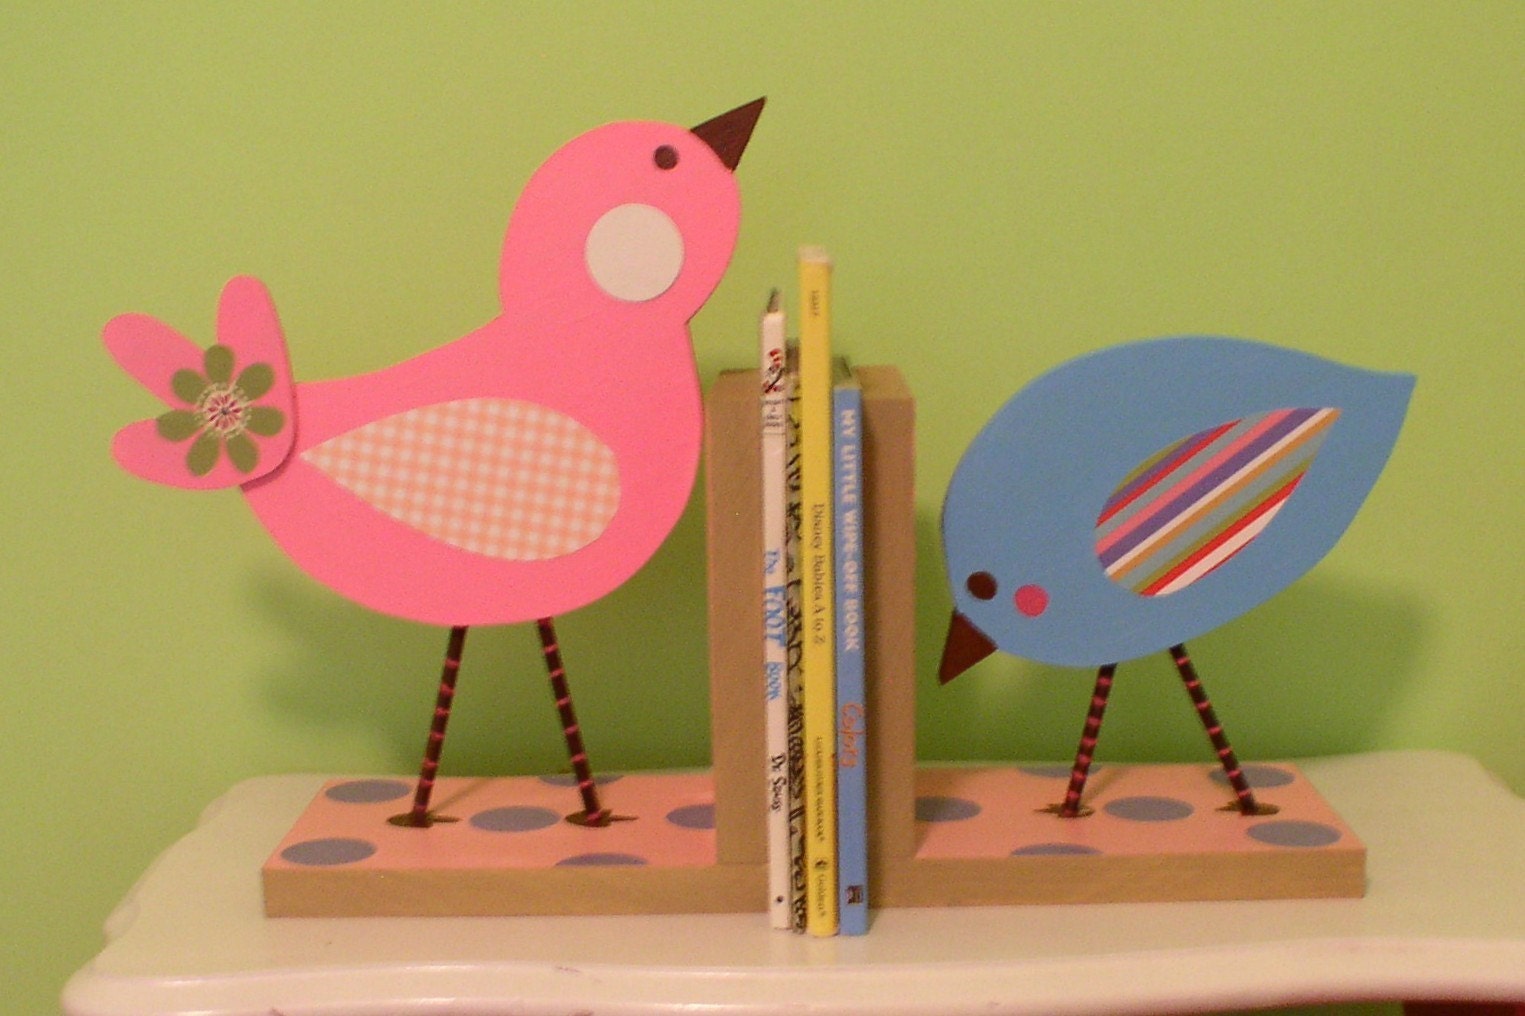
So, a few months of procrastinating later, these were re-assembled on the opposite coast, painted and modge-podged (everything nursery related seems to end in modge podge).

And voila, the final product:

IMGP0009

IMGP0013

Saturday, August 20, 2011

Alphabet Blocks

IMGP0029

I wanted to do alphabet blocks for the nursery because I remember having them as a kid, and I keep seeing them pictured in those fancy houzz.com nurseries I’ve been drooling over as inspiration.

Basically, all you have to do is take some 2x2x4’s that they sell for stair balusters and cut them into blocks. Sand and paint 2 sides of each.

Download the pdf HERE. Print, cut out and modgepodge the letter squares to the blocks, using scrapbook paper to cover the remaining sides. For the letters, I just typed them out using random fonts in MSWord and then cut them out. Cover blocks with another 3 coats of modgepodge, and you’re done!

IMGP0031

Download Printable PDF Here.

In the coming months, if there’s interest, I may upload a set in a more neutral palette, since I know my orange and slate grey nursery isn’t exactly what everyone’s going for these days. It looks great though, I promise:

IMGP0001

Thursday, August 18, 2011

Great Printable Finds

I've been spending some very productive time lately scouring the internet for things that inspire me for future projects for this site. Sure, I could be getting the house ready for the impending arrival of our child, but why prepare when google is there? :P

In all seriousness, I have come across some great printable sites that I thought I'd share.


This site has some fun printables for all occasions. I particularly enjoyed their book labels:


And their vintage bottle labels:


Charlotte's Fancy has some great printables for every occasion:


iDIY has some great printables, especially if you're doing a vintage wedding.


Happy Printing!

Sunday, August 14, 2011

Ricotta and Tomato Tart

IMGP0001

This is a great recipe based on the one in Rose Elliot’s Sumptuous Suppers (I really do like anything with the word sumptuous in the title). It’s one of my favourite cookbooks as it contains lots of great pictures and more gourmet recipes that are relatively easy.

It’s certainly not a healthy meal, though I do substitute some of the cheese with tofu to cut down on the fat (I said some!!), and serve with a spinach salad. I originally wanted to serve it with an arugula salad, but sadly our small town Thrifty Foods doesn’t know what arugula is.

Ingredients:

2 1/2 cups ricotta cheese
1 250g pkg soft tofu
1/4 cup butter, melted
2 eggs plus 2 egg yolks
4 plum tomatoes, diced
1 bunch of fresh basil, loosely torn.
salt and pepper to taste
4 Tbsp Pesto plus more for garnish

Directions:

  1. Preheat the oven to 375F.
  2. Put the ricotta, parmesan and tofu into a food processor. Blend until smooth.
  3. Add butter, eggs and yolks. Season with salt and pepper, and blend until smooth.
  4. Spoon half of the mixture into an 8” springform pan.
  5. In a bowl, combined diced tomatoes with pesto. Add a handful of fresh basil to taste.
  6. Add the tomato mixture to the springform ricotta mixture, spreading lightly until even.
  7. Gently spread the remaining ricotta mixture on top.
  8. Bake tart for 1 – 1 1/4 hours or until browned. A toothpick inserted into the center should come out clean. Let stand for 5 minutes and remove sides of the pan.

The recipe calls for a sauce made of 4 Tbsp pesto with 4 Tbsp water, but I found it made the pesto too watery and didn’t quite balance out the flavours of the cheese, so instead I added the pesto to the center of the cake. Instead, serve with a balsamic glaze and garnish with pine nuts.

Toughest Critic Rating: 8/10

Sunday, August 7, 2011

DIY Spice Labels

IMGP0032

We got a pair of spice racks for our wedding, but because they were two of the same, not a set, we found the pre-labeled jars to be a bit limiting (plus, do you REALLY need 2 jars of dried basil?).

These spice labels were good fun to make.  All you need is a 1.5” round punch and some 8.5x11 sticker paper (the dollar store sells it now, but we used the Avery brand ones – 5 years later and they’re still stuck on).

Spice_Labels_Page_1Spice_Labels_Page_3

Download printable .pdf here.

Friday, August 5, 2011

For the love of Pantone

I saw a great Pantone inspired purse in Style at Home magazine this morning, and thought it would be a great follow up post to the pantone chip magnets from Sunday.  For some reason, I just can’t get enough of the chip look.

So here are some fav pantone finds I thought you might enjoy:

image courtesy of PopDeluxe

image courtesy of Park Life

image courtesy of Remodelista

i-phone cases:

image courtesy of pantone.com

Thursday, August 4, 2011

Clipboard love.

I have a thing for clipboard organizing lately.  My Pantone Meal Planning Paint Chips were inspired by a clipboard find on pinterest, and I really gravitated toward this post from Martha Stewart:

image courtesy of Martha Stewart

Maybe I’m in school withdrawl or something, but I really do like the way clipboards get things off the counter, without getting into the habit of hiding things in a drawer or basket that never gets touched.

For those who are willing to take on the project, a great tutorial for clipboards and matching pads of paper here: LINK.  And then send me pictures, because it was a project I really want to tackle, but need to find a place in our home to use them.

Other great clipboard ideas:

This would be a great way to display or store in progress crafts in a craft room:

image courtesy of roomenvy

This would also be a great way to keep your family organized with notes, permission slips, etc.:

image courtesy of August Vintage

Vintage clipboards would be a neat way to display children’s art:

image courtesy of Darling Dexter